20150111

How to make a simple and engaging GUI application for windows | SLIDE 3

Welcome back this is the Third slide on how to easily develop your own engaging application with a decent GUI in windows
Till now we have setup our basic window with calculator buttons and labeled them ,
Now we will have to setup our display screen where the entered digits , operations and result will be shown 
click on the "text tool" from tools and add a text section to the top of the screen at the desired position
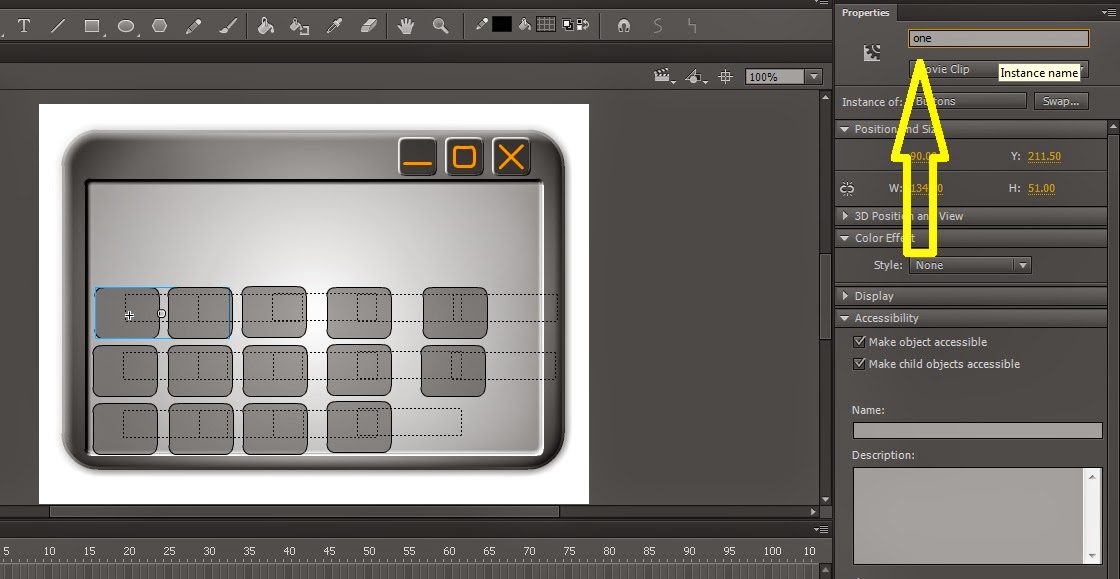
 As shown and change the instance name in property panel to 'result'  and press enter after naming it and change the


 In the timeline select the 'layer2' layer Now go to actions panel and add the following code there after the code already written


var operator_got:Number;
operator_got=0;
//1 - plus 2- minus 3 - multiply 4- divide 
var nos1:Number;
var nos2:Number;
var display_:String;
display_="";
nos1=0;
nos2=0;

one.addEventListener(MouseEvent.MOUSE_UP, click_handler(1)); 
two.addEventListener(MouseEvent.MOUSE_UP, click_handler(2)); 
three.addEventListener(MouseEvent.MOUSE_UP, click_handler(3)); 
four.addEventListener(MouseEvent.MOUSE_UP, click_handler(4));
five.addEventListener(MouseEvent.MOUSE_UP, click_handler(5));
six.addEventListener(MouseEvent.MOUSE_UP, click_handler(6));
seven.addEventListener(MouseEvent.MOUSE_UP, click_handler(7));
eight.addEventListener(MouseEvent.MOUSE_UP, click_handler(8));
nine.addEventListener(MouseEvent.MOUSE_UP, click_handler(9));
zero.addEventListener(MouseEvent.MOUSE_UP, click_handler(0));
equals.addEventListener(MouseEvent.MOUSE_UP, click_handler(10));
plus.addEventListener(MouseEvent.MOUSE_UP, click_handler(11)); 
minus.addEventListener(MouseEvent.MOUSE_UP, click_handler(12)); 
multiply.addEventListener(MouseEvent.MOUSE_UP, click_handler(13));
divide.addEventListener(MouseEvent.MOUSE_UP, click_handler(14)); 


function click_handler(i:int):Function
{
  return function(e:MouseEvent):void {
    if(i<=9){
 if(operator_got==0){
     nos1=nos1*10+i;
  display_=String(nos1);
  
 }
 else{
  nos2=nos2*10+i;
  display_=String(nos2);
  
 }
 result.text=display_;
 }
 else{
  if(i==10){
   if(operator_got==1)
       result.text=String(nos1+nos2);
   if(operator_got==2)
       result.text=String(nos1-nos2);
   if(operator_got==3)
       result.text=String(nos1*nos2);
   if(operator_got==4)
       result.text=String(nos1/nos2);
   
   nos1=0;
   nos2=0;
   operator_got=0;
   
  }
  if(i==11){
   operator_got=1;
  }
  if(i==12){
   operator_got=2;
  }
  if(i==13){
   operator_got=3;
  }
  if(i==14){
   operator_got=4;
  }
 }
  };
}

Now run the application Control -> Test  if the application runs successfully , you are ready to publish your application or create a distributable executable ( .exe ) package you can add  name of your choice to your application by using text tool.

And then click on File - > Publish It may ask you to write the password to the certificate you created in Slide 1 if not click on ok , a folder will be created in the same location you saved project in find the executable file in that folder and run it , If it works fine this application is ready to be run on any system  ,Remember  to send the entire .app folder not just the .exe file .

20150101

How to make a simple and engaging GUI application for windows | SLIDE 2

Welcome Back ,

This is the second slide on how to make your own simple and elegant application for windows If you haven't seen the first slide have a look  here .

We have already setup our basic platform from the last slide over which we will develop our calculator application 

Now on you will be dealing with ActionScript 3 which is similar to javascript

Step 3 Setting up components for calculator 

Go to bottom left hand corner of your window in the timeline right-click on Actions layer name
then click on Insert layer a new layer named Layer 2 would appear right click on this new layer
and click on lock others option

keep this layer 2 selected , Now we will create our buttons for the calculator  , we will design a single button that will have a variable field for number so that we can use the same button for every digit by programmatically changing the value of each button .

> Creating Buttons 

goto Insert ->New Symbol (or press ctrl + F8 )

in the Create New Symbol dialog box  name the new symbol as buttons and  select Type as Movie clip  and click OK

Now a new window will open you will have to design your button here just as you would design it in ms paint but don't label it with any digit yet , Don't create large buttons  because keep in mind you will have to keep all the 10 buttons[ 0 to 9 ] + Addition button +  Subtraction  + Equal to button + a display screen into that window .

After you finish drawing out the button like something very simple like this one

  click on text button in Tools palette  and then click on the center of the button you just drew

  
 Then a text box would appear ,now go to right hand side of your window in the property pane change the instance name to value and press enter after editing the instance name  and change text type to dynamic text as shown in the picture .


also make the text box un-selectable by un-selecting the selectable button in character pan on right hand side below properties (though unselecting is not necessary but it is highly recommended )


Now click on scene 1 on upper right hand corner of your screen just below your project name
you will reach the original window you were on .

Goto  window -> Library

in  library find Buttons and drag and drop it onto the stage (stage is the the actual window you are working on in other words the place your buttons would be located ) ,You will have to do this multiple times  once for each button and arrange the buttons like you would on a calculator this is the beauty of Flash based designing you have an alternative WYSIWYG  method available for many tasks .


Now comes the tedious part think of all the buttons you have put on the stage as objects and these objects don't have a name yet, And  they are of the user defined type of Button which have one property namely value which also needs to be set .

Before we set the property of the buttons you will have to name each one of them , the instance name is a way to name these objects
click on the object(button) you would want to name/want to have the value  '1' now go to property menu and in place of instance name write one (this is case sensitive use lower case only) and press Enter 

Remember to press  enter after renaming an instance name, It  is very important 


Now select button you want to have value 2 and go to properties and change its instance name to two (use lower case only) and press enter  


Similarly name all the rest instances
three, four, five, six, seven,eight , nine, zero , plus , minus, multiply , divide , equals

while naming keep in mind
name them exactly the same as written above and don't change case and don't use any spaces while naming them 

and in the photos above i have dragged only 14 buttons on the screen you will need to drag and drop one more button on the screen for equals button (by going to library and finding buttons and dragging the additional button onto the screen)


You can download a sample .fla file with these steps completed here

now in the timeline , select layer 2 then click on actions if you can't find it click on
 windows -> Actions  now  in the Actions copy paste this code 

1
2
3
4
5
6
7
8
9
one.embedFonts = false;
two.embedFonts = false;
three.embedFonts = false;
four.embedFonts = false;
five.embedFonts = false;
six.embedFonts = false;
seven.embedFonts = false;
eight.embedFonts = false;
nine.embedFonts = false;
zero.embedFonts = false;
plus.embedFonts = false;
minus.embedFonts = false;
multiply.embedFonts = false;
divide.embedFonts = false;
equals.embedFonts = false;

one.value.text="1";
two.value.text="2";
three.value.text="3";
four.value.text="4";
five.value.text="5";
six.value.text="6";
seven.value.text="7";
eight.value.text="8";
nine.value.text="9";
zero.value.text="0";
plus.value.text="+";
minus.value.text="-";
multiply.value.text="*";
divide.value.text="/";
equals.value.text="=";


now click on the stage and now lets save what we have created to far go to 
File - > Save As and create a folder named calculator and save this .fla file there  
 
what this code does is ,it sets the parameter (values) of the objects now you can run what we have done so far by going to Control -> Test 
you should see something like this  


Now you are one step away from making and publishing this calculator application 

Feel free to comment if you are facing any difficulties in getting this up and running  


coming soon : How to make a simple and engaging GUI application for windows | SLIDE 3